Welcome to this month’s Ink, Stamp, Share Showcase Blog Hop.
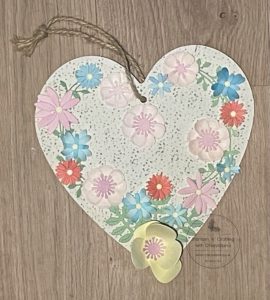
This month I am showcasing a 3D Home Décor item that I made for a swap at a recent Team event using my own painted watercolour card stock.
One thing I love about being a Stampin’ Up! demonstrator is that all the products coordinate. Most of the time I will use the printed card stock available but this can make flowers look a bit uniform. This does not happen in nature as no flower is the same as another. In the Annual Catalogue there are a couple of sets of dies that make making flowers so easy. They are the Dainty Delight dies and the Paper Florist dies.
How to make your own painted watercolour card stock.
First using a sheet of Basie White card stock I used a large brush to cover the card stock with water. Next I put a few drops of Re Inker onto a stamping block. Using the large brush I ‘painted’ the ink all over the wet card stock until I was happy with the correct density of colour. Once I was happy I put the wet card stock to one side to fully dry. I then repeated this until I had enough colours to make my 3D Home Décor piece.
The re inkers I used were:
- Lemon Lolly
- Fresh Freesia
- Azure Afternoon
- Balmy Blue
- Calypso Coral
- Lost Lagoon
Whilst the card stock was drying I painted a wooden heart using white gesso paint. and left it to dry. Next using the dot image from the Layering Leaves stamp set and Smoky Slate ink I stamped dots all over the front of the heart to make a background for my flowers.
How to die cut and make up the painted watercolour card stock flowers.
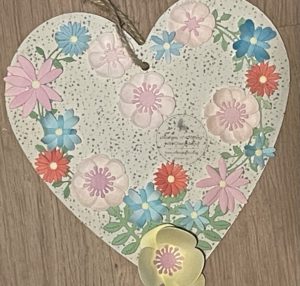
Once the card stock was dry I die cut out the petals and leaves to decorate the wooden heart. I used silicone muffin cases to keep each type of flower separate.
Once I had die cut all my petals and leaves I started to put each flower together. I used a silicone mat and multipurpose glue to make each flower.
The hardest flower to make was the one with the large petals which involved me having to stick each petal base together and then sculpting the outer edge of each petal. For my large flower I used 5 petals as I did not want it to be any bigger and overpower the design.
I found the other flowers much easier to make as they only needed one set of petals stuck on top of another layer of petals. Then each flower was sculpted either using the ball end of my Take Your Pick Tool or pushing the middle of the flower into a Stampin’ Pierce Mat.
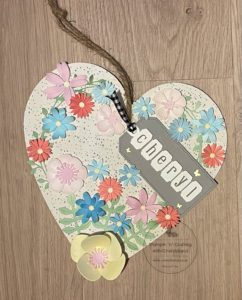
When I had enough flowers and leaves I stuck them onto the painted wooden heart. For my swaps I die cut a tag from the Tailor Made Tags dies and Smoky Slate card stock. I then stamped each person’s name onto Basic White card stock using Smoky Slate ink and the Alphabest stamp set. Then I punched each letter out using the Best Label Punch before adding to each tag using Stampin’ Dimensionals. Finally I added a piece of Black & White Gingham Ribbon to each tag before sticking onto the wooden heart.
I hope you have enjoyed seeing both of my wooden hearts decorated with my own painted watercolour card stock. To see how I used painted watercolour card stock to make flowers for my son’s wedding card please click here. Why not have a go at making your own painted watercolour card stock and use it in your designs.
Of course I would love to see what you make so please do pop a picture onto my Facebook page.
Click Here for my Facebook Page.
Until next time, keep stampin n crafting,

PLEASE NOTE: Due to a recent change in my Demonstratorship, the Product List links may no longer take you directly to the correct products. If you would like to view a product in more detail or place an order, please use the Shop Button below.

Please click on the names below to visit each website and see what lovely projects the others have designed for their Showcase Blog Hop. Please do leave comments as you visit each one. Thank you..
Blog Hop List
Product List
")


 Gingham Ribbon")


FREE TUTORIAL WITH EVERY ORDER
When shopping through my Stampin’ Up! online shop, you will receive an FREE TUTORIAL of 6 simple card ideas. Learn more!
Spend over £45 (before postage and packing) and also receive another FREE Tutorial with 14 more detailed tutorials. Learn more!
Wish to Order. Click here to shop
Thank you for shopping with me!
Remember for every order over £20.00 you will receive 10% rewards to use on your next order.
- Why not subscribe to Paper Pumpkin and get a different surprise kit each month through the post. The monthly subscription price also includes postage.
- For beginner crafters, crafting on the move or as a gift then have a look at our Kits Collection. Each month there are two NEW Kits to choose from.
- For even more options on top of what is in the catalogue have a look at the Online Exclusive selection.

I am an Independent Stampin’ Up! demonstrator for the UK, Ireland, France, Belgium, The Netherlands, Germany and Austria.
Postage is a flat rate of £6.95 / €7.95. Shop for your Stampin’ Up! products here.
Do you need any help?
If you have any questions or need any help with an order then please email me.
Join my Team with a Starter Kit
I would love you to join my team of A Kaleidoscope of Stampers. We are a wonderful, friendly group of crafters who love getting discounts on our hobby or even run a part time or full time business sharing Stampin’ Up! products.
You can find out more here or join straight away.


Just beautiful, what a wonderful swap to receive. Thanks for sharing the idea and technique
Great technique and project!