Welcome to this month’s Ink, Stamp, Share Showcase Blog Hop.
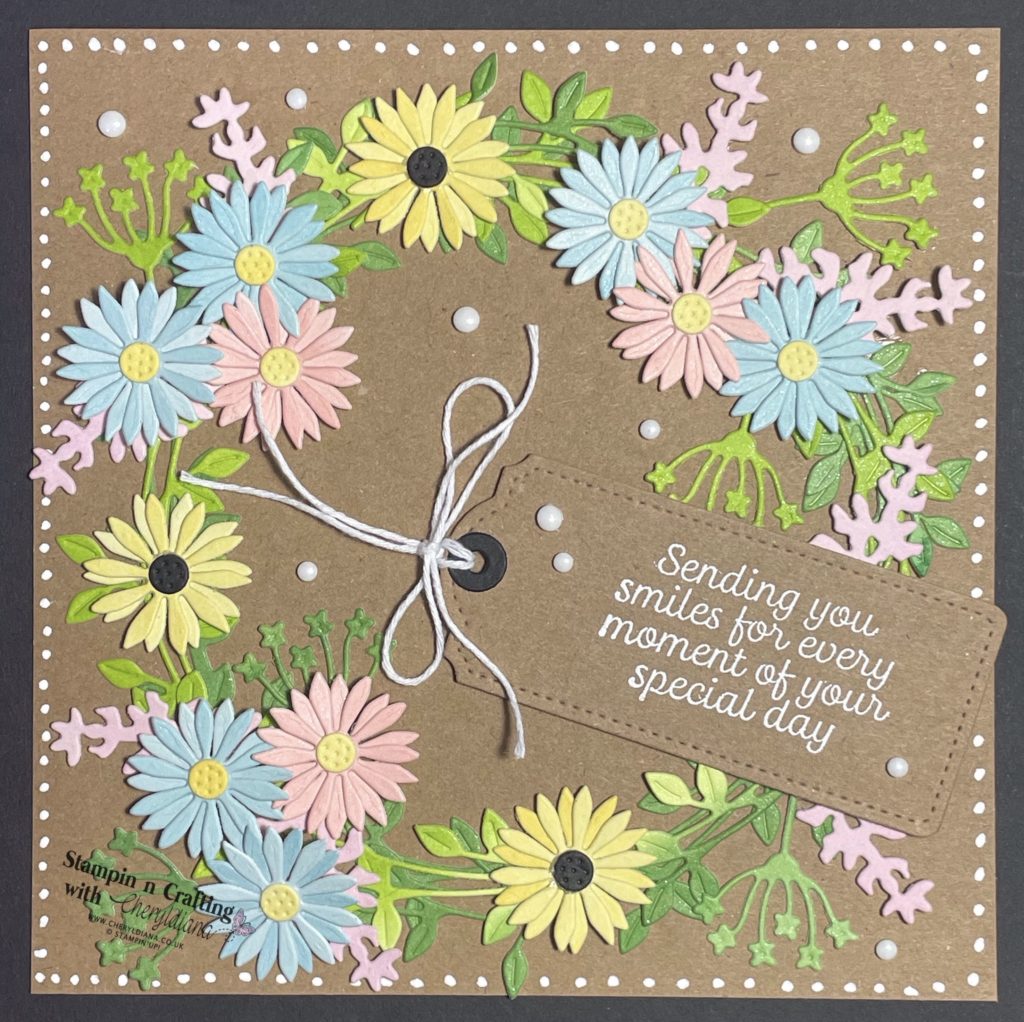
Yesterday was my son’s wedding so of course I had to make a Wedding Card using die cut flowers. I decided to use the Dainty Delight Dies that are available in the Mini Catalogue and also in the NEW Annual Catalogue. Also I love that Stampin’ Up! make some amazing dies that you can use without using the matching stamp set. As there was no set colour scheme I thought it would be very hard to design and make my son and his future wife a suitable card to celebrate their special day. All I knew was that their invite was on Kraft Card so I used this as the base for my card.

How I made my Wedding Card using die cut flowers.
First I had to choose which colours I wanted my flowers and leaves. I used a water brush to ‘paint’ White Shimmer card stock with water and then I added the ink. Next I started by using a block to press onto the ink pad and used the ink from the block to paint onto the damp White Shimmer paper. I also used a few drops from the reinkers to add a much more deeper colour. By ‘painting’ the card stock I was able to get different shades of each colour and as we know flowers and leaves are not one solid colour. Once I was happy with the tones of each colour I put them to one side to dry over night.
Once dry I then die cut out the various elements to make the card. For the leaves I die cut the curve leaf die from the Garden Green and the Granny Apple Green shimmer card. I die cut 3 of each colour and put them to one side. Next I die cut the flower stem with the smaller flowers out of the same shimmer paper. I die cut 2 from each colour.
Then I started to die cut the daisies using the daisy die. I used the Balmy Blue, Flirty Flamingo and Daffodil Delight shimmer paper. I did try using just 1 daisy but it looked batter with 2. Once I was happy with the daisies I stuck them together and added a Daffodil Delight or Basic Black centre to each one. Finally I die cut the hanging flowers using Fresh Freesia shimmer paper.
How I built up my Wedding Card using die cut flowers.
First I cut a 6×6 piece of Kraft card stock down to make a 5 3/4 inch square. This allowed me to have a 6×6 Basic White card base. Next I laid out my die cut leaves and flowers. Using a white gel pen I added dots around the edges.
I stuck the 3 Garden Green curved leaves to make a circle and then I added the 3 Granny Apple Green curved leaved on top. I then started to add the daisies. Initially I was going to have 4 sets of daisies in each corner but it meant that there was no where to add a sentiment. I wanted to put my sentiment onto a Kraft Tag as this is what they were using on their table decorations so I put them in 3 of the corners but slightly out of line.
Next I added the Fresh Freesia hanging flowers behind the cluster of daisies one I was happy I stuck these onto the wreath of leaves. I than added the Balmy Blue and Flirty Flamingo daisies using Stampin’ Dimensionals. The mini sized ones work perfectly behind the daisy centres. Next I stuck the Daffodil Delight daisies between each cluster.
How I finished off my Wedding Card using die cut flowers.
First I stamped my sentiment from the Very Best Occasions stamp set onto Kraft card using Versamark and heat embossed it using White embossing powder. Next I die cut it out using the second largest tag die from Tailored Tags and a Basic Black circle for the top of the tag. I then added a length of White Bakers Twine to the tag and used another length to make a bow. Finally I added some of the White dots from the Classic Matte Dots and stuck the Kraft mat layer onto the Basic White card base.
I do hoe you have enjoyed seeing my Wedding Card using die cut flowers. I am sure that my son and his new wife will love it. Why not have a go at making a card using die cuts rather than stamps and share on my Facebook page.
Of course I would love to see what you make so please do pop a picture onto my Facebook page.
Click Here for my Facebook Page.
Until next time, keep stampin n crafting,

PLEASE NOTE: Due to a recent change in my Demonstratorship, the Product List links may no longer take you directly to the correct products. If you would like to view a product in more detail or place an order, please use the Shop Button below.

Please click on the names below to visit each website and see what lovely projects the others have designed for their Showcase Blog Hop. Please do leave comments as you visit each one. Thank you..
Blog Hop List
Product List
 Cardstock")

 Paper Pack")

")
")

")


FREE TUTORIAL WITH EVERY ORDER
When shopping through my Stampin’ Up! online shop, you will receive an FREE TUTORIAL of 6 simple card ideas. Learn more!
Spend over £45 (before postage and packing) and also receive another FREE Tutorial with 14 more detailed tutorials. Learn more!
Wish to Order. Click here to shop
Thank you for shopping with me!
Remember for every order over £20.00 you will receive 10% rewards to use on your next order.
- Why not subscribe to Paper Pumpkin and get a different surprise kit each month through the post. The monthly subscription price also includes postage.
- For beginner crafters, crafting on the move or as a gift then have a look at our Kits Collection. Each month there are two NEW Kits to choose from.
- For even more options on top of what is in the catalogue have a look at the Online Exclusive selection.

I am an Independent Stampin’ Up! demonstrator for the UK, Ireland, France, Belgium, The Netherlands, Germany and Austria.
Postage is a flat rate of £6.95 / €7.95. Shop for your Stampin’ Up! products here.
Do you need any help?
If you have any questions or need any help with an order then please email me.
Join my Team with a Starter Kit
I would love you to join my team of A Kaleidoscope of Stampers. We are a wonderful, friendly group of crafters who love getting discounts on our hobby or even run a part time or full time business sharing Stampin’ Up! products.
You can find out more here or join straight away.


Such a pretty card Cheryl, love the pastel colour palette x