Welcome to this month’s Stamptastic Friends Blog Hop.
This Month’s Theme is: CASE a Stamptastic Friend.
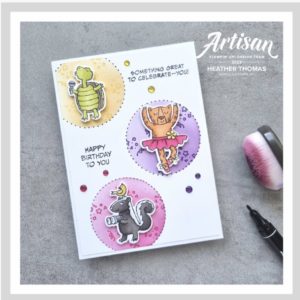
I decided to CASE (Copy And Share Everything) one of my friends, Heather Thomas, who is also one of the members of the 2023 Artisan Team and does the most amazing colouring of which I have been privileged to have attended some of her classes. I noticed that she had made a card similar to one I had previously made for the birth of my Great Nephew but instead of die cutting out the circles she made a home made stencil using a sheet of acetate. Click here to see the card I made for my Great Nephew.
Photo of Heather’s card that she made a stencil using an acetate sheet.
How I made my stencil using an acetate sheet.
First I cut a portrait card base using Basic White Thick card stock. Next I cut a mat layer using Basic White card stock. Using one of the thicker acetate sheets that come in our stamp sets I die cut a circle out of it using one of the circles from the Stylish Shapes dies. This will be my hand made stencil.
Next I placed the hand made stencil onto the mat layer. Using Granny Apple Green and a Blending brush I smooshed ink over the cut out circle. I then moved the stencil onto another care of the mat layer and smooshed Balmy Blue ink over the cut out circle. Finally I repeated this again but used Flirty Flaming ink to smoosh ink over the cut out circle. I love how this is much easier to do thatndie cutting out circles in the mat layer.
How I coloured the Rabbit.
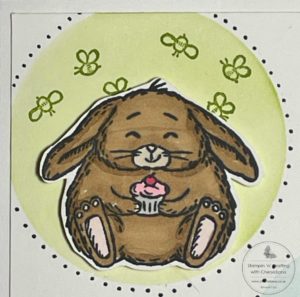
First I stamped out the rabbit, cat and hamster images from the Fluffiest Friends stamp set onto Basic White card stock using Black Memento ink. Then I coloured in the rabbit in using Pecan Pie Light Blend, Crumb Cake Light Blend. Next I used SU100 Blend to colour the pads on his feet and his nose. I coloured in the cup cake using Smoky Slate Light Blend for the cup cake case. I sued Flirty Flamingo Light Blend for the icing and Real Red Light Blend for the cherry.
How I coloured in the Cat.
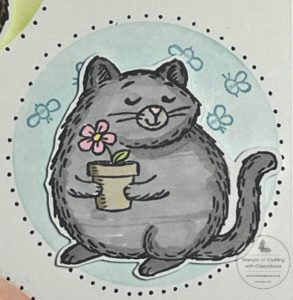
Next I coloured in the cat using Smoky Slate Light and Dark Blends. I coloured in the plant pot using Crumb Cake Light and Dark Blends. The Leaf I coloured in using Granny Apple Green Light Blend and the flower using Flirty Flamingo Light Blend and Daffodil Delight Light Blend.
How I coloured in the Hamster.
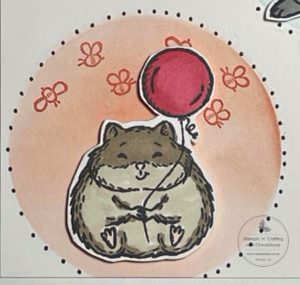
I then coloured in the cute Hamster using Crumb Cake Light and Dark Blends. I coloured his feet and nose in using Flirty Flamingo Light Blend and lastly his balloon using Real Red Light and Dark Blends.
How I finished my card.
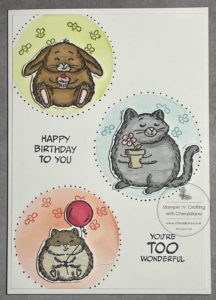
First I used the Basic Black Stampin’ Marker to draw dots around each circle. As you will have seen in previous blogs I often use this technique on my scrapbook layouts but have never thought to do it on a card. I then fussy cut out the rabbit, cat and hamster and laid them on top of each circle. (Yes I did forget to order the matching dies for this stamp set). This gave me an idea of where to stamp the bees. Using the same coloured ink as each circle I stamped two sets of bees near the top of the circle. I added each animal to each circle using Stampin’ Dimensionals.
Finally I stamped the two sentiments from the Zany Zoo stamp set onto the top of the card using Black Memento ink before sticking the mat layer onto the card base.
I really love the idea of re using the thick acetate sheets from my stamp sets into stencils. This means that I can keep on using them time and time again. Why don’t you have a go at making your own hand made stencils using wither dies or punches and please do share what you do onto my website. I am now off to see what other hand made stencils I can make so……
Of course I would love to see what you make so please do pop a picture onto my Facebook page.
Click Here for my Facebook Page.
Until next time, keep stampin n crafting,

PLEASE NOTE: Due to a recent change in my Demonstratorship, the Product List links may no longer take you directly to the correct products. If you would like to view a product in more detail or place an order, please use the Shop Button below.
Please click on the names below to visit each website and see who the others have chosen to CASE and see what lovely projects the others have designed for their Blog Hop. Please do leave comments as you visit each one. Thank you.
Blog Hop List
Product List
")


")

")


FREE TUTORIAL WITH EVERY ORDER
When shopping through my Stampin’ Up! online shop, you will receive an FREE TUTORIAL of 6 simple card ideas. Learn more!
Spend over £45 (before postage and packing) and also receive another FREE Tutorial with 14 more detailed tutorials. Learn more!
Wish to Order. Click here to shop
Thank you for shopping with me!
Remember for every order over £20.00 you will receive 10% rewards to use on your next order.
- Why not subscribe to Paper Pumpkin and get a different surprise kit each month through the post. The monthly subscription price also includes postage.
- For beginner crafters, crafting on the move or as a gift then have a look at our Kits Collection. Each month there are two NEW Kits to choose from.
- For even more options on top of what is in the catalogue have a look at the Online Exclusive selection.

I am an Independent Stampin’ Up! demonstrator for the UK, Ireland, France, Belgium, The Netherlands, Germany and Austria.
Postage is a flat rate of £6.95 / €7.95. Shop for your Stampin’ Up! products here.
Do you need any help?
If you have any questions or need any help with an order then please email me.
Join my Team with a Starter Kit
I would love you to join my team of A Kaleidoscope of Stampers. We are a wonderful, friendly group of crafters who love getting discounts on our hobby or even run a part time or full time business sharing Stampin’ Up! products.
You can find out more here or join straight away.


What an adorable card design using this fun technique. Love how you adapted Heather’s design to create your beautiful card.