Welcome to the Tech 4 Stamper Academy Blog Hop
The theme this month is to CASE the Catalogue
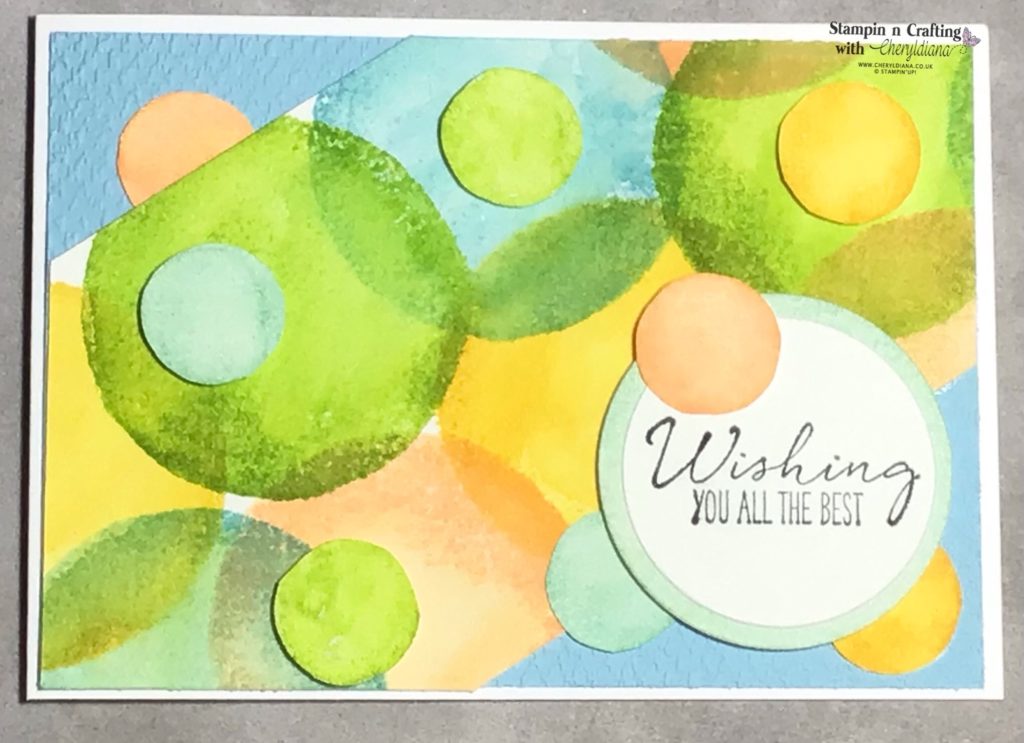
For this month’s theme I looked through the Annual Catalogue, the July to December Mini Catalogue and as I am a demo the NEW January to June Mini Catalogue. I needed to make a Good Luck card for a male friend who is leaving work and moving onto new adventures. I found one card I liked on page 103 of the Annual Catalogue using the Watercolor Shapes stamp set. As I have only used this stamp set a couple of times I decided to make a Water Coloured Shapes Card.
In case you are wondering what CASE means it is when you Copy And Share Everything so I will be making the card as shown in the Annual Catalogue but changing the sentiment and colours.
How to make the Water Coloured Shapes Card
I started off by using the large circle from the Watercolour Shapes stamp set for my main stamp. Next I stamped the image onto the ink pad and spritzed it before stamping onto a sheet of Watercolouring paper. Before it dried I used a Water colour pen to smooth out the inked image. I used Granny Apple Green, Daffodile Delight and Balmy Blue ink pads. As I wanted this to be a male card I swapped out the Highland Heather ink pad for a Pale Papaya ink pad. I then put the stamped watercolour paper to one side to dry over night.
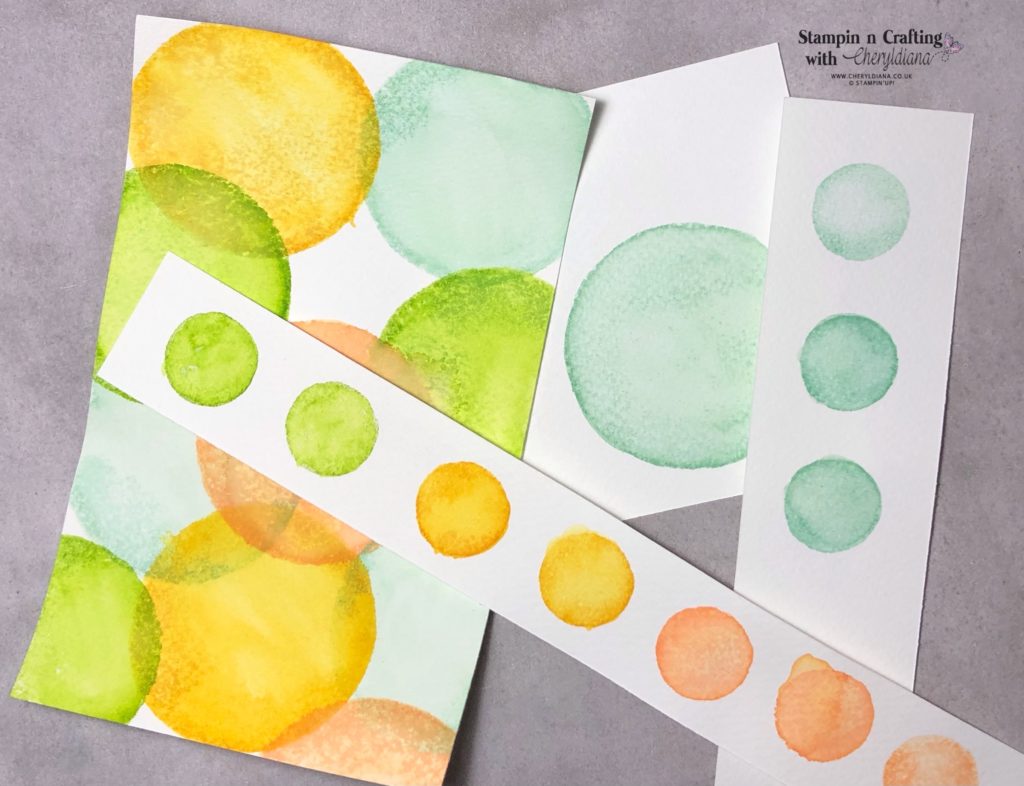
Next I stamped the smaller circle image using the same technique and put to one side to dry.
I managed to find a suitable sentiment from the Garden Wishes stamp set. I stamped the image onto watercolor paper using Tuxedo Black Memento ink.
Next I stamped another larger circle using Balmy Blue and again spritzed and water brushed over the image. I will use this one for my sentiment mat layer.
Putting the Water Coloured Shapes Card Together
Once the stamped images were dry I fussy cut out the smaller circles and die cut the large sentiment circle using one of the Layered Circle dies.
Next I cut a 10cm x 14.3cm piece of Balmy Blue card stock and embossed it using the Textured Embossing Folder.
I then placed the large background stamped paper on top of the Balmy Blue mat layer and cut it to size. I then stuck it onto the Balmy Blue mat layer. Then I stuck one of the smaller circles was just behind the top edge.
Next I added more of the small circles using Stampin’ Dimensionals to add height.
I then stuck the stamped sentiment onto the sentiment mat layer to the bottom of the card. Finally I added three smaller circles around it.
I enjoyed making this card and am really pleased with how it turned out.
Of course I would love to see what you make so please do pop a picture onto my Facebook page.
Click Here for my Facebook Page.
Until next time, keep stampin n crafting,

PLEASE NOTE: Due to a recent change in my Demonstratorship, the Product List links may no longer take you directly to the correct products. If you would like to view a product in more detail or place an order, please use the Shop Button below.

Thank you for visiting my website today. Please click on the list of names below to see what the other members of the Tech 4 Stampers Academy have chosen to CASE this month. Please leave comments as you visit each one. Thank you.
Blog Hop List
Product List
FREE TUTORIAL WITH EVERY ORDER
When shopping through my Stampin’ Up! online shop, you will receive an FREE TUTORIAL of 6 simple card ideas. Learn more!
Spend over £45 (before postage and packing) and also receive another FREE Tutorial with 14 more detailed tutorials. Learn more!
Wish to Order. Click here to shop
Thank you for shopping with me!
Remember for every order over £20.00 you will receive 10% rewards to use on your next order.
- Why not subscribe to Paper Pumpkin and get a different surprise kit each month through the post. The monthly subscription price also includes postage.
- For beginner crafters, crafting on the move or as a gift then have a look at our Kits Collection. Each month there are two NEW Kits to choose from.
- For even more options on top of what is in the catalogue have a look at the Online Exclusive selection.

I am an Independent Stampin’ Up! demonstrator for the UK, Ireland, France, Belgium, The Netherlands, Germany and Austria.
Postage is a flat rate of £6.95 / €7.95. Shop for your Stampin’ Up! products here.
Do you need any help?
If you have any questions or need any help with an order then please email me.
Join my Team with a Starter Kit
I would love you to join my team of A Kaleidoscope of Stampers. We are a wonderful, friendly group of crafters who love getting discounts on our hobby or even run a part time or full time business sharing Stampin’ Up! products.
You can find out more here or join straight away.