
Welcome to the Scrapbooking Global Blog Hop.
The theme this month is: Blind Scrapping.
The theme for this month has been decided by the talented Courtenay Heuston.
Did you know that Blind Scrapbooking is using written instructions to make a scrapbook layout? Oh and by the way there are no pictures/images for you to follow.
I have never done a scrapbook layout this way but as you all know sometimes we just need to try something outside of our comfort zone and learn a new technique or way of doing something.
Using Written instructions to make a Scrapbook Layout
What you need and measurements
- Base plain cardstock
- Designer Series Paper –
- 1 Pattern 12x 3 approx
- 2 Pattern piece 10 x 2 approx
- 3 pattern piece 8×2
- Matching cardstock to suit Designer Series Paper
- Title approx 1” tall x 4” approx
- 1 large decorative edged shaped
- Tag
- 30cm thin solid colour twine
- 7-10 small embellishments
- 6-8 medium sized embellishments
- 1-2 large embellishments
- Gems if desired
- Other supplies – Adhesives, Inks, stamps & Markers
How to make the scrapbook layout
- Ink and or stamp around the edges of your cardstock
- Using pattern piece 1 doodle around the edges then place on your layout about halfway down and across the middle of your base piece.
- Using your 2 other pieces of Designer Series Paper doodle or stamp around the edges. Lay your largest piece approx one inch from the left hand edge vertically on the base. Lay the second piece on top of this piece but about 2 inches from the left hand edge.
- Matt photo with thin boarder on cardstock or Designer Series Paper
- Place photo approx 3 inches from left
- Cut decorative edged shape in half – add this so it sits just below your photo
- Make title using some large letters ad to right hand side of photo on Designer Series Paper strip
- Add a tag with the date to the top left of your photo – this should be a little over your photo
- Wrap your twine into a double or triple loop add to page at bottom right of photo
- Add a cluster of your embellishments on the bottom right incorporating the twine and over the corner of your photo.
- Add a couple of smaller embellishments to the left of your photo then add one larger embellishment to the top right of your page for balance.
- Add some journalled details in the lower right 1/4 of your page.
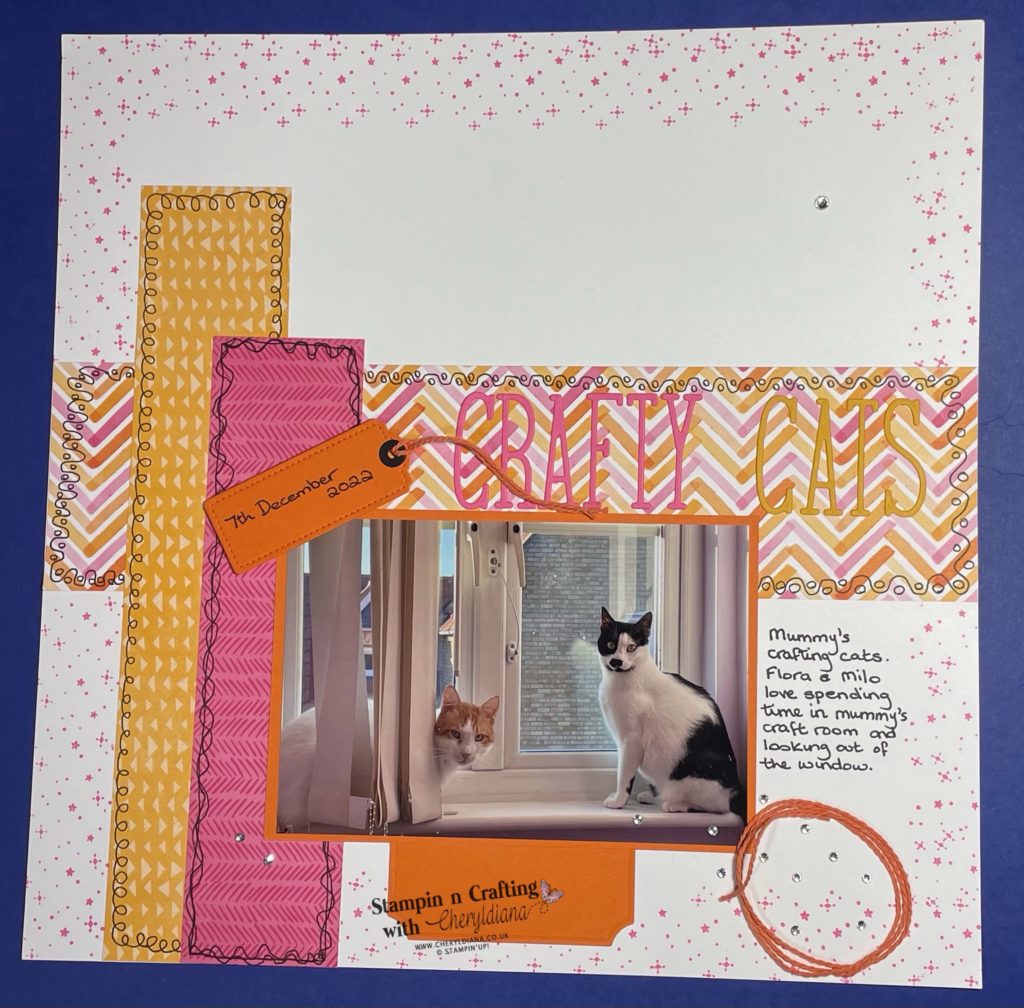
Using written instructions to make a scrapbook layout
So here is what I ended up with by using written instructions to make a scrapbook layout.
Click Here for my Facebook Page.
Until next time, keep stampin n crafting,

PLEASE NOTE: Due to a recent change in my Demonstratorship, the Product List links may no longer take you directly to the correct products. If you would like to view a product in more detail or place an order, please use the Shop Button below.

Please click on the NEXT button to visit the wonderful XXXX to see her map scrapbook layout. Please remember to leave comments as you visit each person. Thank you.

Blog Hop List
Product List
")

")
 Designer Series Paper")
 Cardstock")


FREE TUTORIAL WITH EVERY ORDER
When shopping through my Stampin’ Up! online shop, you will receive an FREE TUTORIAL of 6 simple card ideas. Learn more!
Spend over £45 (before postage and packing) and also receive another FREE Tutorial with 14 more detailed tutorials. Learn more!
Wish to Order. Click here to shop
Thank you for shopping with me!
Remember for every order over £20.00 you will receive 10% rewards to use on your next order.
- Why not subscribe to Paper Pumpkin and get a different surprise kit each month through the post. The monthly subscription price also includes postage.
- For beginner crafters, crafting on the move or as a gift then have a look at our Kits Collection. Each month there are two NEW Kits to choose from.
- For even more options on top of what is in the catalogue have a look at the Online Exclusive selection.

I am an Independent Stampin’ Up! demonstrator for the UK, Ireland, France, Belgium, The Netherlands, Germany and Austria.
Postage is a flat rate of £6.95 / €7.95. Shop for your Stampin’ Up! products here.
Do you need any help?
If you have any questions or need any help with an order then please email me.
Join my Team with a Starter Kit
I would love you to join my team of A Kaleidoscope of Stampers. We are a wonderful, friendly group of crafters who love getting discounts on our hobby or even run a part time or full time business sharing Stampin’ Up! products.
You can find out more here or join straight away.


Love the gorgeous starry stamped edge of your page. And it looks gorgeous with these papers.
lol – that was my plan to get everyone to step out of their comfort zone – how great did your page turn out? I think it is a job well done. Thanks heaps for joining us.
Adorable! These colors pop really nicely! Great job with your doodling!
Wow!!! Fabulous colours and love love all that doodling! It’s such a pretty page!! Gorgeous
I love the bright colours you have chosen for your layout Cheryl, so fun. I love your doodling too, I struggle with freehand.