
Welcome to this month’s Tech 4 Stampers Academy Blog Hop.
This month’s theme is: Springtime.
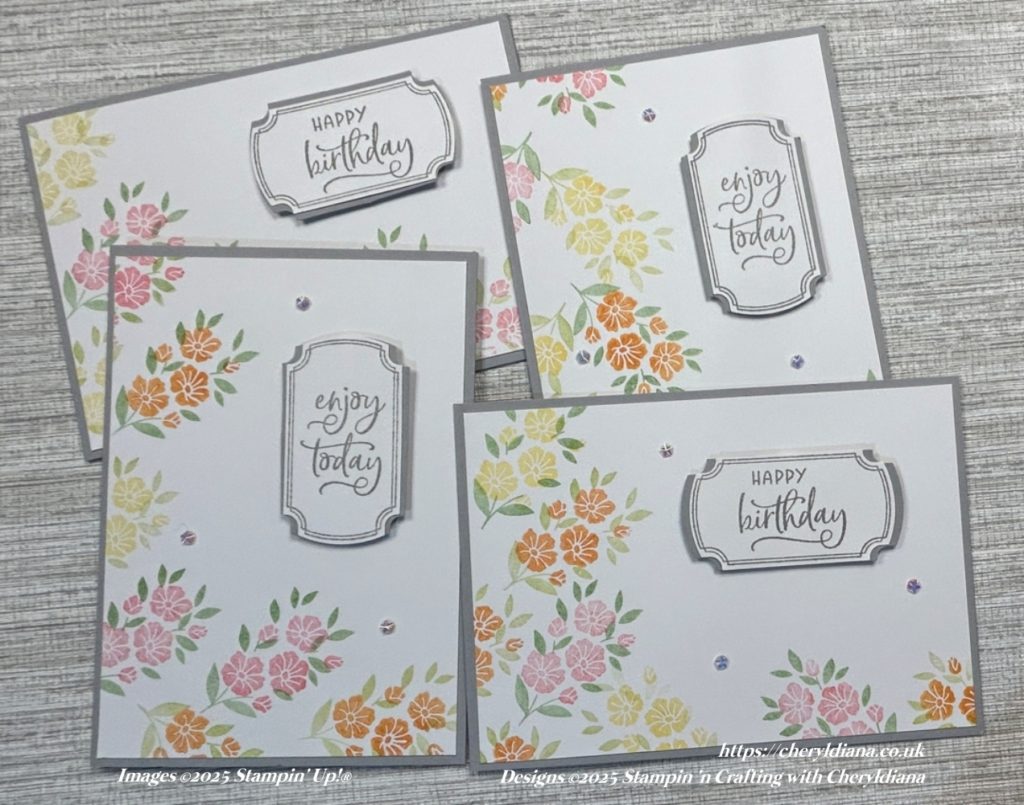
This month I have been showing various techniques that you can do both as a beginner and a more advance card maker. So I have decided to use two sets of cards I made during a recent YouTube Live using the Stamping Off technique to make my own backgrounds. These Springtime cards are great for any occasion and are easy to actually make.
How to make my first set of Springtime cards for any occasion

To make my first set of Springtime Cards for any occasion I started off by using a whole sheet of Basic White card stock and stamped the leaves from the Labeled With Love stamp set to stamp a mixture of leaves. Some using the ink straight from the ink pad and then stamping another group of leaves onto the Basic White card stock before I inked the stamp again. This is called the Stamping Off Technique. I stamped the leaves along the middle of the card stock both portrait and landscape so they cross over.
I then stamped the flowers using Highland Heather ink, Fresh Freesia ink and Petal Pink ink to go in the gaps in the leaves.
Next I cut the stamped Basic White card stock in quarters and then cut each piece down to make a mat layer. I then added one of each mat layer to a mixture of portrait and land scape Smoky Slate card bases.
For the sentiment I stamped each sentiment onto Basic White card using Smoky Slate ink and punched out using the Labeled With Love punch. (With this stamp set you get the choice of either a matching punch or 3 matching dies). I then punched out another label using Smoky Slate card stock. I cut each one in half and stuck to the back of the sentiment to make a mat layer. Once this was done I added the sentiments to each card using Stampin’ Dimensionals. Finally I added some Iridescent Faceted Gems to the card fronts.
How to make my second set of Springtime cards for any occasion
To make my second set of Springtime Cards for any occasion I did the exactly the same as my first set but used the following colours instead:
- Garden Green Ink
- Granny Apple Green ink
- Real Red ink
- Daffodil Delight ink
- Pumpkin Pie ink
This time as the colours were from the Bright’s Family I stamped off the ink each time to give a more subtle look. I finished the cards in exactly the same way as my first set of Springtime cards.
If you would like to see how I actually made these two sets of Springtime cards for any occasion then please click on my YouTube link below.
I do hope that you have enjoyed seeing how I made both of these sets of Springtime cards for any occasion. Please do have a go yourself and see what amazing colour combinations you come up with. Of course I would love you to share your makes onto my Facebook Page.
Click Here for my Facebook Page.
Until next time, keep stampin n crafting,

Please click on the names below to visit each website and see what lovely projects the others have designed for their Springtime Blog Hop. Please do leave comments as you visit each one. Thank you.
Blog Hop List
Product List
")

")

")


FREE TUTORIAL WITH EVERY ORDER
When shopping through my Stampin’ Up! online shop, you will receive an FREE TUTORIAL of 6 simple card ideas. Learn more!
Spend over £45 (before postage and packing) and also receive another FREE Tutorial with 14 more detailed giftable ideas. Learn more!
Wish to Order. Click here to shop
Thank you for shopping with me!
Remember for every order over £20.00 you will receive 10% rewards to use on your next order.
- Why not grab a bargain at the Last Chance Products – Save up to 60% ‘whilst stocks last’.
- For beginner crafters, crafting on the move or as a gift then have a look at our Kits Collection. Each month there are two NEW Kits to choose from.
- For even more options on top of what is in the catalogue have a look at the Online Exclusive selection.

I am an Independent Stampin’ Up! demonstrator for the UK, Ireland, France, Belgium, The Netherlands, Germany and Austria.
Postage is a flat rate of £6.95 / €7.95. Shop for your Stampin’ Up! products here.
Do you need any help?
If you have any questions or need any help with an order then please email me.
Join my Team with a Starter Kit
I would love you to join my team of A Kaleidoscope of Stampers. We are a wonderful, friendly group of crafters who love getting discounts on our hobby or even run a part time or full time business sharing Stampin’ Up! products.
You can find out more here or join straight away.


These are so pretty. Not noticed those tiny flowers before.
What pretty cards. they would make a great gift set of cards.
Love the colours on both sets..very pretty
I do love a stamped background! Great cards Cheryl