
Welcome to the Scrapbooking Global Blog Hop
The theme this month is:

The theme for this month has been decided by the talented Tina Parson.

This month I have decided to make my scrapbook layout based on a sampler layout but make it fit a 12×12 page layout. I have not made a scrapbook page using a 9 square sampler layout for a while. These make doing a scrapbook layout so easy and it is very quick to do.
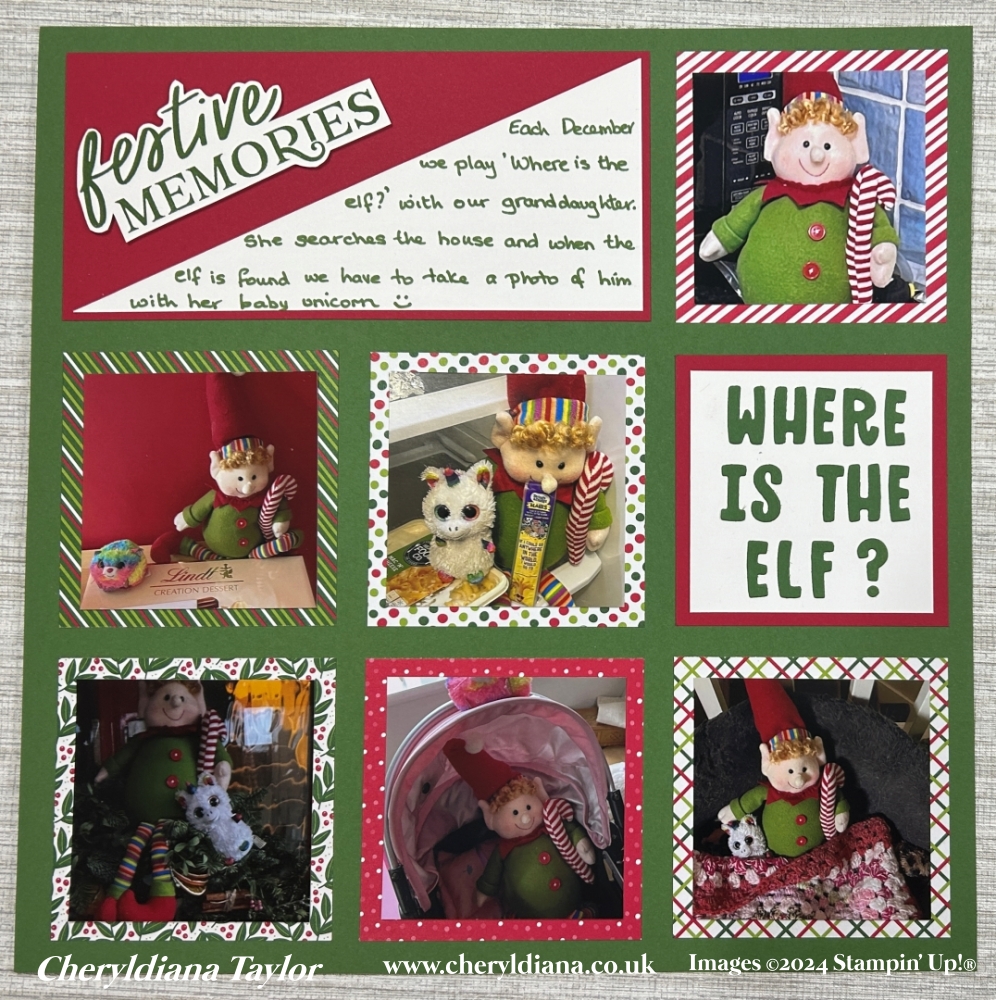
Since last December I have wanted to scrapbook a game my husband and I play with our granddaughter. I have a Christmas Elf that we hide around the house and our granddaughter has to see if she can find him. Then when she finds him we have to take a photograph of where he is hiding with her baby unicorn. On Christmas Eve we had both grandchildren and my grandson joined in. This December he will enjoy it much more as he will be 3 years old.
How I made my scrapbook layout based on a sampler layout – page 1
I started with a 12″ x 12″ piece of Garden Green card stock. Next I cut out 6 3 1/2″ x 3 1/2″ pieces of Take a Bow designer series paper. I then cut a 3 1/2″ x 3 1/2″ piece of Real Red card stock and a 7 1/2″ x 3 1/2″ piece of Real Red card stock. Next I stuck these onto my Garden Green 12″ x 12″ piece of card stock.
How to do the Title and Journaling on my scrapbook layout based on a sampler layout.
I decided that I would do my title and journaling on the same mat layer. First I cut a 7 1/4″ x 3 1/4″ piece of Basic White card stock and then I cut it diagonally to make a triangle. I wrote my journaling onto the Basic White triangle using a Garden Green Stampin’ Write Marker. Next I stuck this triangle onto my Title/Journaling mat layer. I then stamped the ‘Festive Memories’ onto a piece of Basic White card stock using Garden Green ink. Next I fussy cut it out before sticking it onto the Real Red mat layer across the top.
For my question ‘Where is he?’ I die cut out the letters out of Garden Green card stock using the Mini Alphabet dies. Next I cut a 3 1/8″ x 3 1/8″ piece of Basic White card stock and stuck the letters onto it before sticking it onto the Real Red mat layer.
Finally I added my photographs to the mat layers.
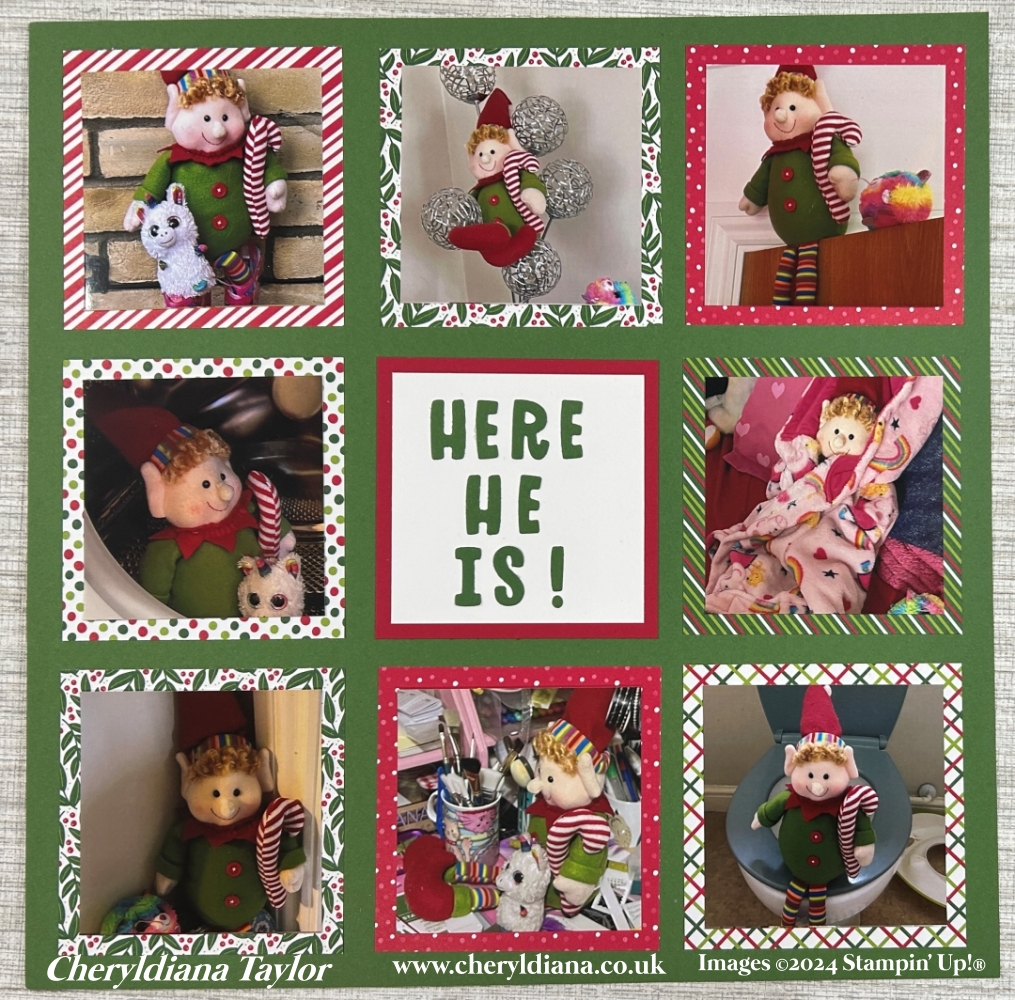
How I made my scrapbook layout based on a sampler layout – page 2
So again I used a 12″ x 12″ piece of Garden Green card stock. I then die cut 8 more 3 1/2″ x 3 1/2″ pieces of Take a Bow designer series paper and a 3 1/2″ x 3 1/2″ piece of Real Red card stock. These I stuck onto the Basic Green card stock. For the question box I cut a 3 1/8″ x 3 1/8″ piece of Basic White card stock. Again I die cut the letters for ‘Here he is!’ out of Garden Green card stock using the Mini Alphabet dies. Once I have stuck them on I stuck the Basic White mat layer onto the Real Red mat layer.
Finally I added my photographs to the mat layer.
I really enjoyed making these 2 scrapbook layouts based on a sampler layout. It was really easy to do and of course you can join 2 squares together to make a rectangle. You can also move the squares around to make other layouts.
Click Here for my Facebook Page.
Until next time, keep stampin n crafting,

Please click on the NEXT button to visit the wonderful Michele to see her favourite scrap lifted scrapbook layout. Please remember to leave comments as you visit each person. Thank you.
Blog Hop List
Product List
 Designer Series Paper")


 Cardstock")


FREE TUTORIAL WITH EVERY ORDER
When shopping through my Stampin’ Up! online shop, you will receive an FREE TUTORIAL of 5 simple card ideas. Learn more!

Spend over £45 (before postage and packing) and also receive another FREE Tutorial with 15 more detailed giftable ideas. Learn more!
Wish to Order. Click here to shop
Thank you for shopping with me!
Remember for every order over £20.00 you will receive 10% rewards to use on your next order.
- Why not subscribe to Paper Pumpkin and get a different surprise kit each month through the post. The monthly subscription price also includes postage.
- For beginner crafters, crafting on the move or as a gift then have a look at our Kits Collection. Each month there are two NEW Kits to choose from.
- For even more options on top of what is in the catalogue have a look at the Online Exclusive selection.

I am an Independent Stampin’ Up! demonstrator for the UK, Ireland, France, Belgium, The Netherlands, Germany and Austria.
Postage is a flat rate of £6.95 / €7.95. Shop for your Stampin’ Up! products here.
Do you need any help?
If you have any questions or need any help with an order then please email me.
Join my Team with a Starter Kit
I would love you to join my team of A Kaleidoscope of Stampers. We are a wonderful, friendly group of crafters who love getting discounts on our hobby or even run a part time or full time business sharing Stampin’ Up! products.
You can find out more here or join straight away.


Such a cute layout!
What a fun way to document your Elf’s antics for the month! I love the grid. Great layout. Every photo has it’s own little story. Love it!
Too cute! Love the game you play with your grandaughter.
I love this layout because of how many photos you can add on it! Plus use a flip flap to add even more!!! Great design!
Oh this is so much fun!! And I mean the pages and the amazing story behind the photos!! Love it.