Welcome to the first Stamp ‘N Hop Blog Hop of 2022
The theme this month is Mixing the Old with the New
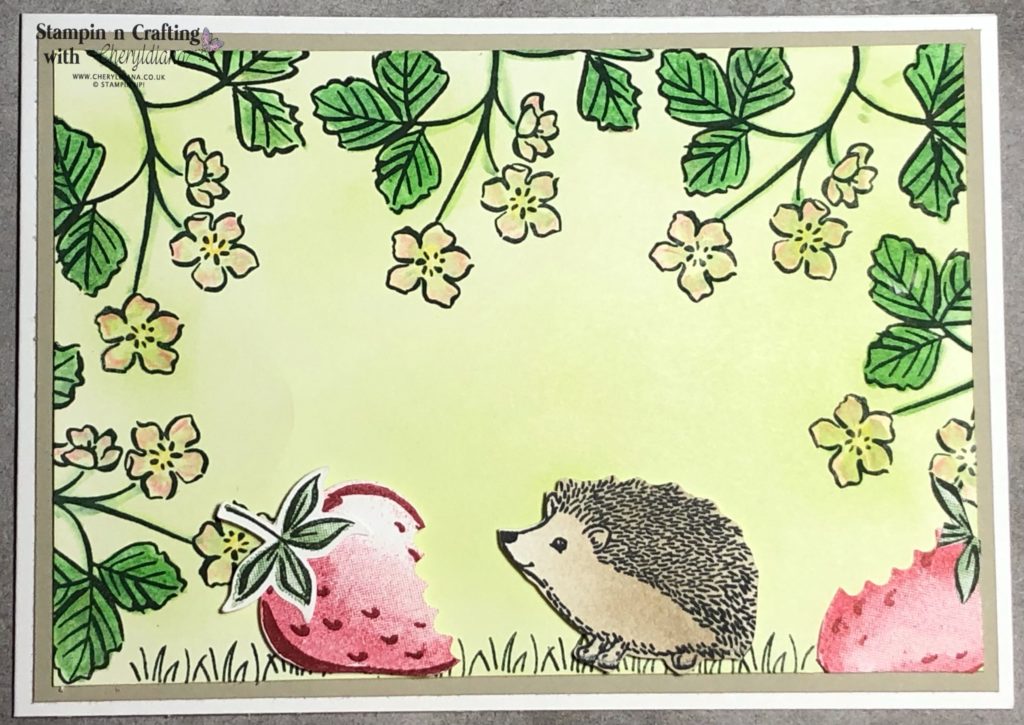
For my Mixing the old with the new blog hop I decided to use the Happy Hedgehogs stamp set and matching Hedgehog Builder punch together with the Sweet Strawberry stamp set and matching Strawberry Builder punch to make a Hedgehog eating Strawberries card.
When I initially saw the Happy Hedgehog stamp set I knew I had to get it as I used to be a hedgehog rehabilitator and support the British Hedgehog Preservation Society and local hedgehog rehabilitators. I knew I could use the stamp set to make a selection of cards for local hedgehog rehabilitators to sell.
When I saw the image of the smaller hedgehog I though he looked like he was eating something so what better than to design a card using the Sweet Strawberry stamp set. By using both of these stamp sets and punches I have been able to mix the old with the new and make a Hedgehog eating Strawberries card.
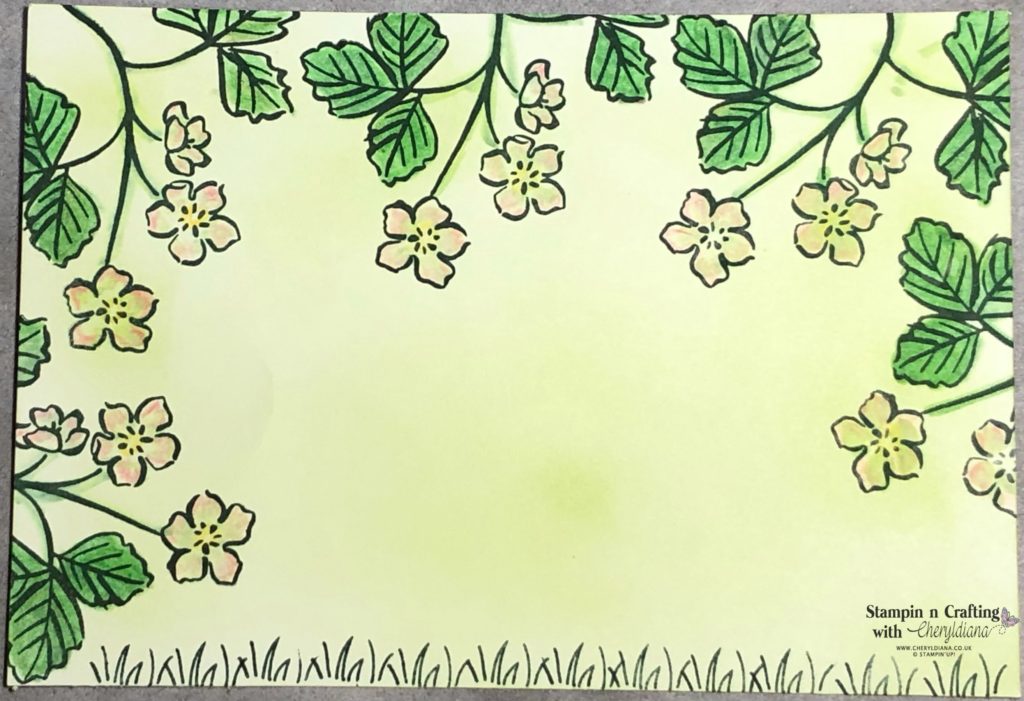
How to make the background to the Hedgehog eating Strawberries Card
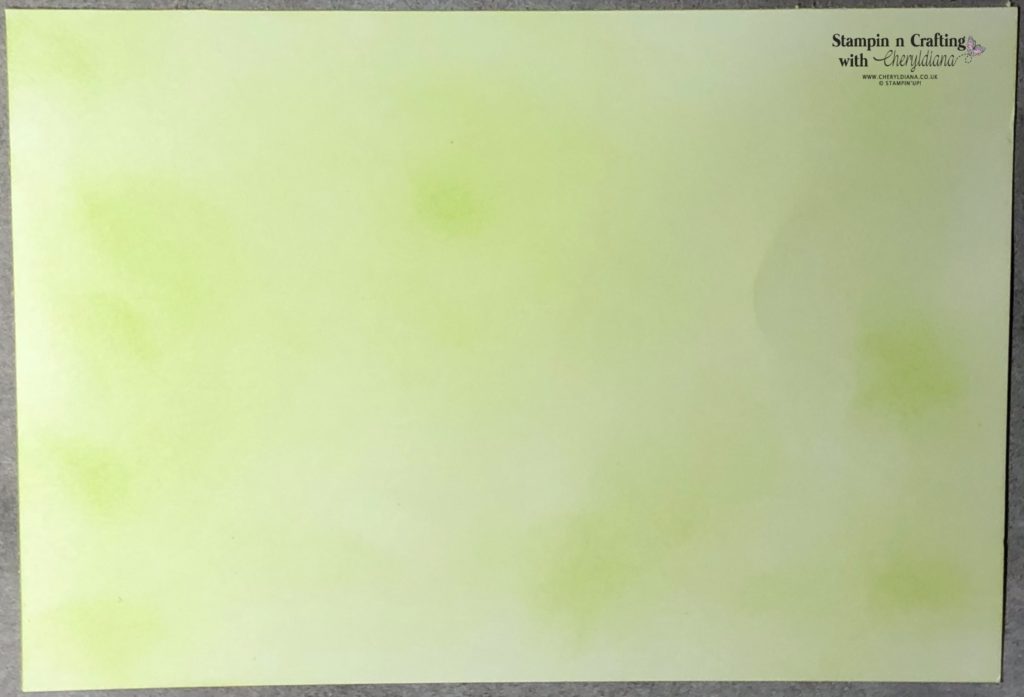
I started off by cutting a 9.5cm x 13.8cm piece of Basic White card stock. Next I used a blender brush to smooch Granny Apple Green ink all over the card to make a background.
Next I stamped the strawberry flower stems using Evening Evergreen. I then coloured in the leaves using Garden Green and Granny Apple Green water colour pencils. Then I blended the colours using a Blender Pen to give a brighter colour.
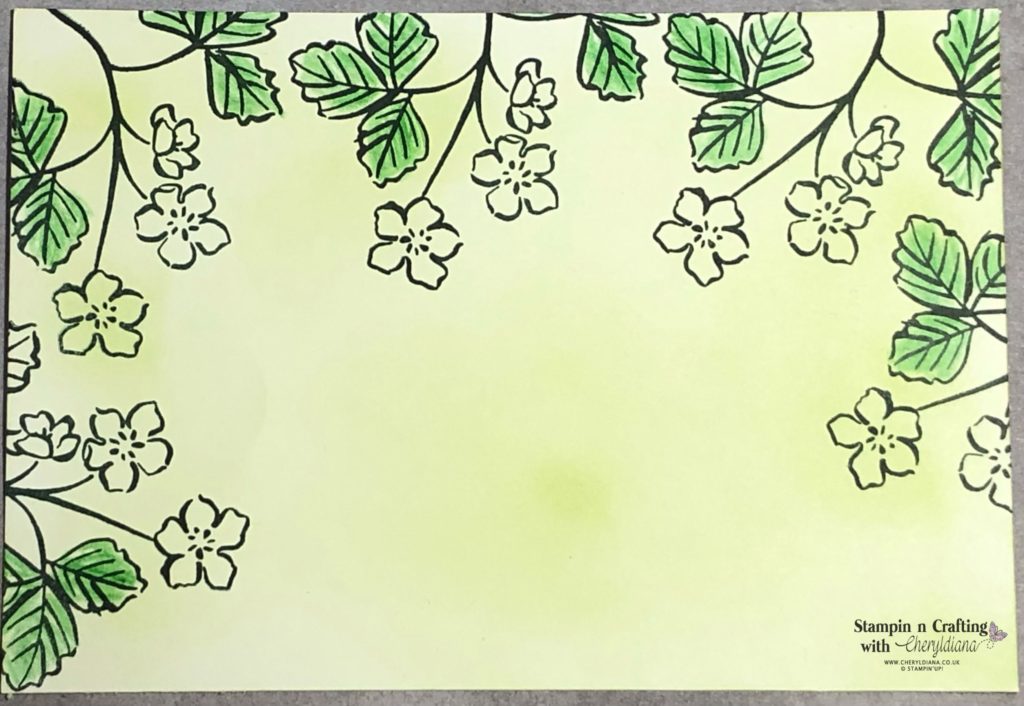
I then used the Flirty Flamingo, Daffodil Delight and White water colour pencils to colour in the flowers. Again I blended the colours using a Blender Pen.
As the bottom of the card front look a bit bare I stamped the grass image from the Happy Hedgehogs along the bottom using Evening Evergreen ink.
How to make the Strawberries
Next I stamped the strawberry outline using Cherry Cobbler ink and stamped it off onto a piece of scrap paper before stamping it onto a scrap of Basic White card stock. I then stamped the strawberry filler image on to the stamped outline image using Real Red ink. I repeated this again so I had two strawberries. Then both images were punched out using the Strawberry Builder punch.
As I wanted the strawberries to look like the hedgehog had taken bites out of them I used the Hedgehog Builder punch to punch out parts of the strawberries.
Next I stamped the top of the strawberry image outline onto Basic White card stock using Evening Evergreen ink. I then stamped the filler image using Garden Green ink to tie it into the stamped leaves on the card front. I repeated this again to make two sets of leaves for the strawberries. Again I punched both out using the Strawberry Builder punch.
Next I took one of the strawberries and one of the strawberry tops and fussy cut them so there was no white border around them. I then stuck one of the strawberries onto the bottom right of the card front so it was just on the card front and trimmed the overlap to the card front. I did the same with the top of the strawberry.
With the remaining strawberry I mounted it onto the card front using Stampin’ Dimensionals and then stuck the top of the strawberry onto it.
How to make the Hedgehog
Next I used another Blending Brush to smooch Sahara Sand nk on to a scrap of Basic White card stock. I then stamped the small hedgehog image on top of the smooched area using Black Memento ink. As this smaller hedgehog does not fit the punch I fussy cut it out.
Finally I added the punched out Hedgehog using Stampin’ Dimensionals.
Finishing off the Hedgehog eating Strawberries card
To finish off the card I cut a 10.5cm x 14.3cm mat layer using Sahara Sand. Next I cut a piece of Basic White Thick card stock in half along the short edge and scored it at 14.85cm. I stuck the Smoky Slate mat layer onto the card base and then stuck the card front onto the mat layer. Finally I will add a sentiment once I decide what I will be using the card for.
I hope you have enjoyed seeing my Hedgehog eating Strawberries card and how by using products from the Annual Catalogue you can add products from the New January to July Mini Catalogue. Why not have a go yourself?
Click Here for my Facebook Page.
Until next time, keep stampin n crafting,

PLEASE NOTE: Due to a recent change in my Demonstratorship, the Product List links may no longer take you directly to the correct products. If you would like to view a product in more detail or place an order, please use the Shop Button below.

Thank you for visiting my website today. Please click on the NEXT button to visit the wonderful Rochelle and how she has used Mixing the Old with the New for her project.

Blog Hop List
- Vicky Wright – Australia
- Jacqui Lawrence – UK
- Sandra Roberts – UK
- Donna Lester
- Jo Blackman – UK
- Mo Rootes UK
- Liz Yuille – UK
- Karen Egan
- Gez Carpenter
- Nicole Mahler
- Annette Elias
- Victoria Littlewood
- Cheryl Taylor – UK
- Rochelle Laird-Smith
- Annette Ball
- Jenn Curtis Charles
Product List
")


")

")


FREE TUTORIAL WITH EVERY ORDER
When shopping through my Stampin’ Up! online shop, you will receive an FREE TUTORIAL of 6 simple card ideas. Learn more!
Spend over £45 (before postage and packing) and also receive another FREE Tutorial with 14 more detailed tutorials. Learn more!
Wish to Order. Click here to shop
Thank you for shopping with me!
Remember for every order over £20.00 you will receive 10% rewards to use on your next order.
- Why not subscribe to Paper Pumpkin and get a different surprise kit each month through the post. The monthly subscription price also includes postage.
- For beginner crafters, crafting on the move or as a gift then have a look at our Kits Collection. Each month there are two NEW Kits to choose from.
- For even more options on top of what is in the catalogue have a look at the Online Exclusive selection.

I am an Independent Stampin’ Up! demonstrator for the UK, Ireland, France, Belgium, The Netherlands, Germany and Austria.
Postage is a flat rate of £6.95 / €7.95. Shop for your Stampin’ Up! products here.
Do you need any help?
If you have any questions or need any help with an order then please email me.
Join my Team with a Starter Kit
I would love you to join my team of A Kaleidoscope of Stampers. We are a wonderful, friendly group of crafters who love getting discounts on our hobby or even run a part time or full time business sharing Stampin’ Up! products.
You can find out more here or join straight away.


Love this!! Such a sweet card!
Cute little card I can’t wait to get my hands on this set x
What a fun card. The partly eaten strawberry is genius. Lx
Cute card Cheryl, great minds think alike with the lovely hedgehogs. Good idea to team up with the strawberries. x
Cute card Cheryl, love the half eaten strawberry x
Cute card 🙂
Love this, so cute, love what you did with the strawberries, very clever x
This is adorable!!
Too cute! I love how you worked the “Sweet Strawberries” set into the card.
Cute and clever card – love it!
How clever are you Cheryl? Love it & great card. That little Hedgehog looks so pleased with himself. TFS & for joining us this month at Stamp n Hop.
What a great idea, such a cute card!