Welcome to my blog hop. For this blog hop I have decided to show you how versatile Stampin’ Up! products are to use and how everything coordinates. None of that does this red match that red. You all know that feeling and how frustrating it is!
For this blog I decided to showcase the Animal Expedition Suite from the annual catalogue (page 26-27).
My first project was to design 3 cards:
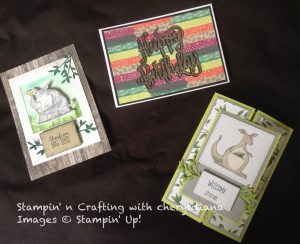
I decided to remake the rhino one that had been one of my Quick and Easy Cards into a more advanced card by raising up elements of the card. I decided that the white Wood Textures DSP would look better than plain Whisper White card stock.
With the Kangaroo card I decided to have the opening at the front of the card. I love how the DSP looks on the panels of the card.
The final card I was going to use the Taylored Tag punch to punch out the DSP as they reminded me of African patterned material. As I was looking for the punch I came across the Classic Label punch and tried that instead. I love how the patterns turned out. I wanted to tie the cards together so I die cut the Happy Birthday in Wood Textures DSP and mounted it onto a die cut Basic Black Happy Birthday.
My next project is an IKEA Ribba Photo Frame.
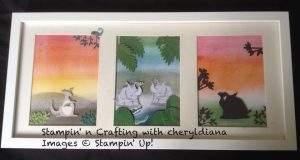
I had the idea of using Animal Expedition Suite to make pictures for it. I wanted to make a back ground for each animal plus have a silhouette picture.
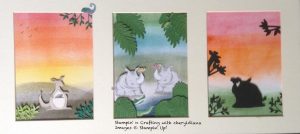
All the backgrounds have been done with sponge brayers and re inkers. I love how the backgrounds turned out.
Kangaroo Picture

For this picture I die cut lots of leaves in Shaded Spruce and Garden Green card stock. As you can see some are stuck straight onto the base whilst others have been raised. The Kangaroo is die cut from the DSP and is also raised up from the base. To finish off the picture I fussy cut one of the lizards from the dsp.
Rhino Picture
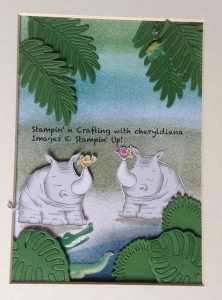
I wanted a swampy feel to this picture so I die cut the leaves from the Tropical thinlits, fussy cut the rhinos, crocodiles and lizard from the DSP. These were then stuck onto the card base.
The Silhouette Picture
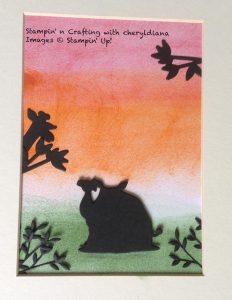
This one was easy to do as all the elements used were die cut from Basic Black card stock and stuck to the base card.
My next project was to make a mirror using the IKEA MALma mirror
This project took the most time. The mirror base was primed using Gesso primer. I then used a side of a Stampin’ Up! box to make the tree and branches. I die cut a template in card to use as a mask for the embossing paste which was coloured using Crumb Cake reinker.
I painted the tree and brances using Early Espresso and Crumb Cake reinkers. The mirror base was sponged using Pear Pizzaz and Mossy Meadow reinkers.
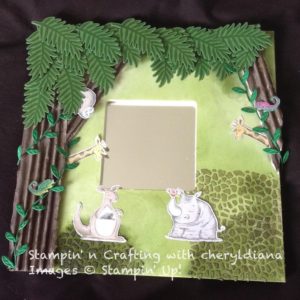
Whilst the inks were drying I stamped and die cut the leaves from the Tropical XYZ in Garden Green Ink onto Garden Green card stock. These were stuck along the top of the mirror to make a tree canopy.
I used the Leaf ribbon to make vines climbing up the trees. The animals were all die cut using the dies and stuck onto the mirror.
My Final Project is Of course a scrapbook page.

For this I made another mask and sponged crumb cake and mossy meadow through it onto the page. As the DSP is so vibrant I cut strips and using the Triple Banner punch punched the ends. Leaf ribbon was glued along both sides, then more of the Tropical leaves were glued in 2 corners.
I made a photo mount using Lemon Lime Twist and Smokey Slate card stock and stuck this onto the page leaving a gap along the bottom for a pull out tag for journalling. Then using the same colour card stock I made the pull down tag.
The title was made using the Large Letter framelits and DSP mounted onto more Lemon Lime Twist and Smokey Slate card stock. The small letters are from the Labeler Alphabet stamp set which were stamped using memento ink and Lemon Lime Twist card stock.
All that is left to do now is to find a suitable photo and add journalling.
I hope you have found some inspiration and ideas from this blog and can see how every product from a Stampin’ Up! suite matches and how you can mix different products into that suite.
Goodbye for now.
ADDITIONAL INFORMATION
- Request a free catalogue – click to request a Stampin’ Up! catalogue on the Contact me at the top of my home page.
- Go straight to my On-Line Shop
- April’s Shop code is QNFCYZXW – Please use this when your order is less than £149
- If your order is over £150, please do not use this code.
- Remember when placing a large order or wanting to host a party then you will also get Stampin’ Rewards for any orders or party orders over £150.
- Coordinating Bundles – Save 10% on stamp sets and with matching dies or punches
- Grab a bargain at the Clearance Rack – Save up to 60% ‘whilst stocks last’
- Newsletter – Sign up for my newsletter, classes and latest special offers by clicking on the button on the right hand side of your screen
- Join Now – Get £130 worth of products for only £99. Choose from current catalogues and any specials available. Free shipping and special demonstrator benefits


Fantastic projects Cheryl. Lovely colours and I like the mirror . X
Lovely projects and great use of the Animal Outings bundle.